TWS is a Great Training Option for Everyone
Learn more about how we can prepare you to advance your career.
Looking for ways to practice your newly learned welding skills? Put your metal-fusing know-how to work with these small, beginner welding projects. With short supply lists and construction times, these DIY welding projects are simple but fun, and many can make great gifts for any occasion.
1. Scrap Metal Doorbell
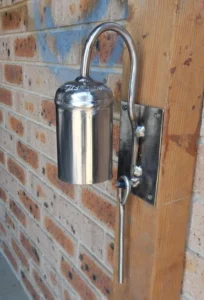
If you’re looking to start a small welding project from scrap metal, make a doorbell. Rustic and exceptionally loud, this doorbell is a fitting gift for friends or family with a country-style home.
This is also the perfect project for repurposing old argon cylinders. Just make sure the cylinder you use never contains flammable gas and there’s no pressure in it anymore.
Have You Considered a Career in the Skilled Trades?
Fill out the form to recieve a no obligation info packet.
Tools Needed
Besides the cylinder, you’ll need:
- a steel rod and plate
- a drill and bits
- an angle grinder with cutting and flap discs
Steps to making a scrap metal doorbell:
- Cut the valve of the cylinder off first and then the bottom.
- Remove the paint with the angle grinder and drill a hole in the center for the rod.
- Cut and bend one piece of rod to attach the bell to the steel plate that you’ll mount to the wall.
- Cut another to serve as an unattached clapper (the part you ring the bell with).
- Weld the pieces together and give the bell a final coating of anti-corrosive.
2. Industrial Pencil Holder
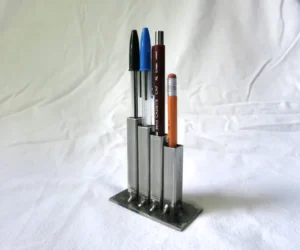
To make a DIY industrial pencil holder, all you’ll need is a square tube, 12-gauge steel sheet and spray paint.
Tools needed:
The main tools, besides your welding machine, will be files, a hacksaw and a bench vise.
- Cut the steel tube into four sections. These will serve as the pencil and pen holders.
- File the top and bottom of each piece.
- Cut the sheet steel into the base and tack weld the pieces of tubbing to it.
3. Scrap Metal Box
Practice your MIG welding skills by making a scrap metal box. The supply list is super short: 1/8” steel from any scrap yard.
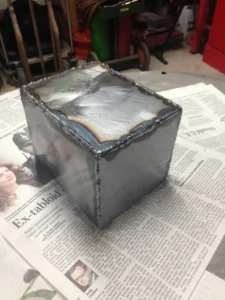
Of course, you can choose a different size depending on how big of a box you want to make.
Tools needed:
- Plasma cutter
- Clamps
- Sander
- Soap stone marker
- Measurement tape
Steps to welding a metal box:
- Measure the base and sides of the box, marking where to cut with the soap stone.
- Make 2 short sides and 2 long sides with the plasma cutter.
- Label the pieces with your soap stone marker and smooth them out with a vertical belt sander.
- Use magnetic clamps to line up the base and side and tack weld them in place.
- Fill in the seams with your MIG welder.
- Clean and polish the box.
4. Metal Heart

An easy welding project and a sentimental way to recycle an old bike chain.
Tools needed:
Besides the used chain, the welding tools you’ll need are pliers and a hammer or chain cutter.
Steps to welding a DIY metal heart:
- Simply cut the chain (measure first if necessary)
- Fashion it into a heart shape
- Weld together the pieces
You can make any size, from a small pendant for a necklace to an ornament to hang on the wall.
5. Horseshoe Dutch Oven Holder
Wrap this lucky holder up for friends who love camping or simply love cooking with a Dutch oven.
Tools needed:
To try this western-themed easy welding project, all you’ll need are:
- 3 horseshoes
- a tin of enamel
- 3 steel rods
- an angle grinder
Steps for welding a Dutch oven:
- Once you’ve cleaned the dirt and rust off the horseshoes, position them in a triangular formation.
- Weld where the rounded edges meet. Repeat the welds on the other side.
- Weld the steel rods at a 90-degree angle to the left tail of each horseshoe.
- Grind down sharp edges and coat with enamel.
Beginner – Advanced Welding Projects
In addition to beginner welding ideas, we’ve put together some more advanced projects with plans that will help novice welders practice core techniques while providing a bit of a challenge.
6. A Welding Table
A sturdy welding table is a great first project that will last a lifetime. This 45-page plan, designed by a welder with 20 years of experience, is ideal for dedicated beginners or intermediate fabricators looking for a challenge.
Tools & Materials Needed:
- Steel frame tubing
- steel plate for the tabletop
- welding clamps
- angle grinder
- measuring tape
Steps to welding your own table:
- Cut and prepare steel tubing for the table frame.
- Weld the frame together, ensuring proper alignment and stability.
- Attach the steel tabletop, securing it with welds at key points.
- Grind down rough edges and finish as desired.
7. A Go-Kart Frame
A beginner-friendly yet engaging welding project, this go-kart frame can be built in a weekend. The plans include detailed fabrication instructions and a glossary of AWS welding symbols for reference.
Tools & Materials Needed:
- Steel tubing
- metal plates
- welding machine
- angle grinder
- measuring tape
Steps to welding a go-kart frame:
- Cut steel tubing according to the design plan.
- Weld frame sections together, following precise measurements.
- Attach crossbars and support structures for added stability.
- Smooth out welds and inspect for structural integrity.
8. Metal Artwork
You can create art no matter your skill lever. Projects can range from simple garden flowers to famous art sculptures.
Materials Needed:
- Scrap metal
- sheet metal
- welding rods
- angle grinder
- paint (optional)
General steps to create welding art:
- Sketch a design or use an existing template.
- Cut metal pieces to shape using an angle grinder or plasma cutter.
- Weld pieces together, experimenting with different techniques.
- Polish, paint, or finish the piece as desired.
9. A Garden Bench
A functional and decorative piece, this garden bench is a great project for beginners who want to refine their skills. The 14-page plan provides step-by-step instructions with AWS symbols.
Materials Needed:
- Steel tubing
- flat steel bars
- wooden slats (optional)
- welding machine
Steps to welding a garden bench:
- Cut steel tubing for the bench frame and legs.
- Weld frame components together, ensuring structural support.
- Attach seat and backrest elements using welded brackets or screws.
- Grind down sharp edges and apply a weather-resistant finish.
More Challenging Welding Projects
DIY welding projects like these provide an opportunity to take your skills out of the lab before you’re working in the field. They can be fun, easy ways to make homemade gifts.
As you advance in your welding training, you may want to take on bigger projects to help spruce up your house or yard. When you’re ready, try these 5 challenging welding projects.